Sunday, November 16, 2014

Green Tomato Jam


The Joy of gardening in Canada!
Even if the calendar says it is spring, you cannot seed or plant yet.
The growing season (the number of days between the last frost in spring and the first frost in fall- time for plants to grow from seed to maturity) in a cold climate won’t begin until end of May, when the risk of frost is completely gone.
In February-March there is a lot of excitement around garden planning and even starting seeds inside. And then the waiting begins.

Basically there are just 3.5 months of « safe gardening » June, July, September and the first 2 weeks of October. And then the inevitable occurs : you wake up one morning just to find your plant leaves half burnt from an early freeze.
How frustrating ! Your vegetable leaves are all withered. The beautiful tomatoes that you just starting enjoying, the butternut squashes, your pride hanging naked now that their huge leaves are withered. I will not list all of them.

So you have to pay attention to frost warning issued by the weather forecast and harvest everything that’s ready or almost. I used to let green tomatoes continue to ripen on the counter but most of them were damaged after few days before ripening.
And then I remembered that my mother used to make ripe tomato jam, which I hated! I thought I should try it with green tomatoes and maybe just maybe my family will like it.

Guess what? I like it more than they do! The longer it cooks the better it gets. Actually it tastes very much like fig jam. If you try it let me know if you agree.


Ingredients
2.2 lb green tomatoes washed and cut into small pieces
1.1 lb sugar


Directions
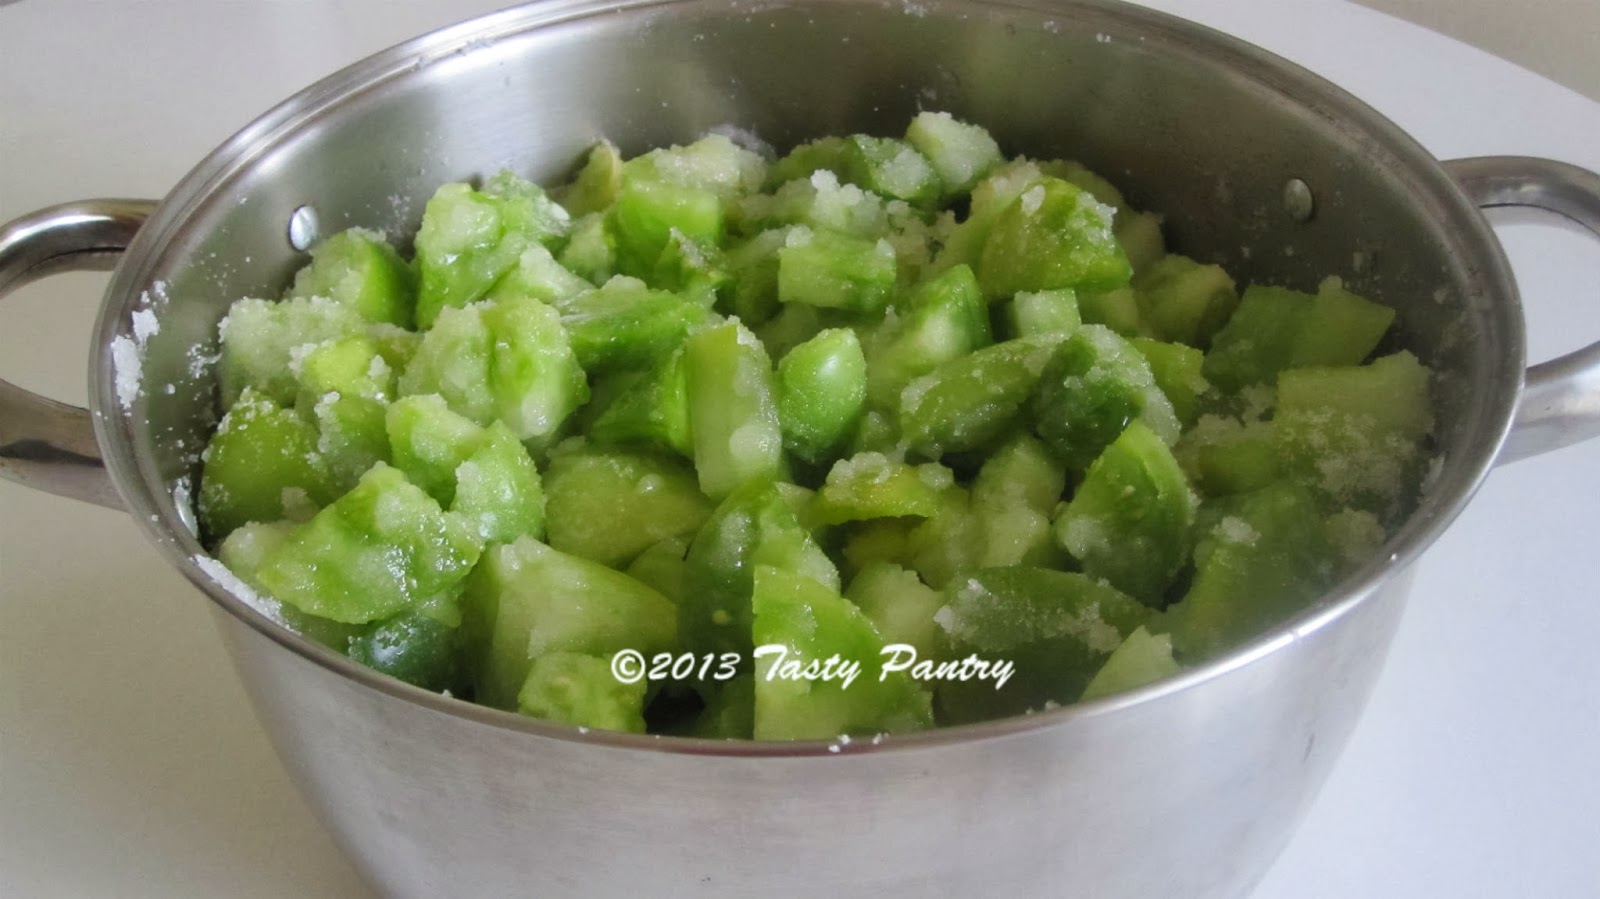
  1. In a large pot, mix the tomatoes and the sugar, cover and let stand few hours or overnight in the fridge. The tomatoes will release their juice.


  2. Bring to a boil on a medium-high heat. When the liquid reaches the boiling point lower the heat to medium-low. Cook around 45 minutes or until the jam takes a slightly amber color.
  3. Fill the jars while jam is still hot, so you will not need to sterilize.
  4. Wipe the rim clean and seal.


Monday, October 27, 2014

Apple and Prune Crumble


This is my favorite dessert: very quick and easy to make and it's always a hit with my family. Feel free to substitute the type of apples and the flavor to match what you have at hand.

Ingredients
6 prunes cut in 4
6 apples (such as Cortland, Golden delicious)
1/3 cup heavy cream
1 cup brown sugar + 2 Tbs
1 cup all-purpose flour
1 cup rolled oats
3/4 cup butter at room temperature
1 teaspoon freshly grated ginger
11-by-8 inch baking dish

Directions
  1. Preheat the oven to 350°F.
  2. Lightly coat the baking dish with butter.
  3. Mix the oats, flour and sugar in a bowl. Add the butter in pieces and blend in with your fingers until the mixture looks like coarse bread crumbs.
  4. Peel, core and slice the apples approximately 1/4inch thick. Place directly in the baking dish. Add the prunes, 2 tablespoons sugar , the ginger, the cream and toss to coat.
  5. Top evenly with the crumble mix.
  6. Bake until golden and bubbly 40- 45 minutes.


Saturday, April 19, 2014

Almond Sugar Coated Crescents


This is another delicious traditional Algerian cookie. They are melt-in-your mouth, shortbread-like cookies flavored with orange blossom water. These are my long time favorite. I wonder why I don't make them more often!
Not only they are delicious but while you are making them the whole house smells amazing with the fragrance of orange flower. To me this is the best scent in the world!
You may shape them as doughnuts or crescents, which I find easier.
They can be stored for few weeks in a well sealed container.


Ingredients
For the cookie dough
1 ½ cup flour
1 teaspoons baking powder
½ cup butter softened
1 tablespoon shortening
1/4 cup granulated sugar
1 egg
2-3 tablespoons orange blossom water

For the stuffing
1 cup almond meal
1/3 cup granulated sugar
Pinch cinnamon
2 tablespoons orange blossom water

For the icing
1/3 cup orange blossom water
2 cups confectioners' sugar

Directions
Prepare the cookie dough and the almond stuffing
  1. Mix all the ingredients of the stuffing together in a small bowl.
  2. Combine together the flour and baking powder in a bigger bowl.
  3. Make a well and add the sugar, egg, butter and shortening. Mix well, then gradually incorporate the flour. The dough should be soft but hold together. If it’s too hard, add 1 tablespoon of orange blossom water at a time. Form a ball and let it rest. I put it to chill in the fridge for 1 hour.

Make and bake the crescents
  1. Preheat oven to 350 degrees.
  2. Line 1 large baking sheet with parchment.
  3. Roll out cookie dough on a lightly floured working surface approximately 1/4 inch thick. Cut out cookies with a 2 1/2-inches round cutter ( if you don’t have any, you can use a glass.)
  4. Place about 1 teaspoon of the stuffing in the center of each circle and fold in two.


  5. Pinch the edges and shape into crescents.


  6. Place on baking sheet about 1 inch apart.


  7. Bake 15-18 minutes or until very lightly browned. Let cool completely.

Icing the crescents
  1. Prepare three bowls that are wide enough to dip the cookies easily.
  2. Pour the orange blossom water in bowl #1. Sift half the confectioner’s sugar into bowls #2 and the other half in bowl #3. This is because the first sugar bowl will get lumpy after the first dipping. To have a nice white finish, you have to dip it into a dry batch.
  3. Lightly dip each cookie in the orange blossom water (#1) then toss into the icing sugar (#2). Coat well and pat to remove the excess.
  4. Place on a cookie sheet and repeat the operation for all the cookies.
  5. Coat a second time with the icing sugar in bowl #3 to get a nice snow white color.
  6. Place on the cookie sheet and let dry.

Finally enjoy!

Tips
  1. The use of shortening makes the dough easier to work with and results in a more melt-in-the mouth cookie.
  2. Orange blossom water also called orange flower water is used in many Mediterranean dessert dishes. You can find it at Middle Eastern grocery store. Some local grocery stores carry it in the cakes and baking section. It is very affordable and can be stored for months.

Monday, February 17, 2014

Mango Cheesecake


Cheesecake is my favorite cake. My daughter knows it very well so she made this one for my birthday. She is an excellent cook, but she is at her infancy when it comes to baking. I was taken by surprise when she came home with this beautiful cake. To my delight, this was one of the best cheesecake I have ever had, smooth, slightly tangy and thick like a true New York cheese cake! She gladly offered to share her recipe.

Ingredients
Crust
1 3/4 cups Graham cracker crumbs
2 Tbsp sugar
Pinch salt
5 Tbsp melted unsalted butter

Filling
2 pounds cream cheese cut in chunks
1 1/4 cup granulated sugar
4 eggs
2/3 cup sour cream
2/3 cup heavy cream
Zest of 1 lime
Juice of 1/2 lime

Topping
1 cup mango chunks
½ cup mango juice
3 Tbsp sugar
Juice of ½ lime
¼ cup water
1 pack of gelatin (1 tbsp)

9 Inch springform pan

Directions
The cake is baked in bain-marie (double boiler). Here is how to prepare: wrap the springform pan in an aluminum foil sheet large enough to cover the bottom and the edges to avoid any water leaking into the cake.

Prepare the crust:
  1. Preheat the oven to 350 degrees F.
  2. Mix the graham cracker crumbs, sugar and the melted butter together. Put in the bottom of the springform pan. Press with your fingers to have an even layer while shaping a small edge inside the pan.
  3. Cook for 10 minutes. Remove and let cool.
In a mixer with the flat beater attachment :
  1. Beat the cream cheese until soft and creamy, scraping down the edge of the bowl every couple of minutes. This step is very important. That’s what make your cake light and fluffy.
  2. Add the sugar and beat for a couple extra minutes until the mixture becomes frothy.
  3. Add the lime juice and zest.
  4. Add eggs, one at a time making sure they are fully incorporated before adding the next one.
  5. Add the sour cream and beat.
  6. Add the heavy cream.
  7. Beat for a couple more minutes until the cheese mixture is soft and light.
  8. Pour batter into prepared pre-cooked crust.
  9. Place the pan into a larger cake pan or roasting pan and place in the oven. Carefully pour enough hot water into the pan to come halfway up the side of the springform pan.
  10. Bake at 325 degrees F for 1 ¼ hour to 1 ½ hour or until the edge is set but the centre still jiggles slightly. Turn off the oven and let the cake cool in the oven for 2 hours. Remove from water, cover and refrigerate for few hours or overnight.
To Make the topping:
  1. Blend mango chunks into a pulp.
  2. Add mango juice, lime juice and sugar and mix.
  3. In a separate bowl heat the water and mix in the gelatin until fully dissolved.
  4. Add the liquid gelatin into the mango mixture and stir.
  5. If needed add more water until you have 1 ¾ cups of mango jelly mix.
  6. Put in the freezer and turn with a spoon every 5 minutes until gelatin starts setting (this is so the mango topping doesn’t drip off the sides of the cheesecake.)
  7. Stick a parchment paper all the way around the cheesecake to make a "mould" for the jelly.
  8. Pour the mango topping over the cheesecake and immediately put in the fridge.
  9. After a couple of hours, it’s safe to remove the parchment paper.

Finally enjoy a piece!

Tuesday, February 11, 2014

Red Velvet Cupcakes


This is my first attempt at cupcakes. My daughter has been asking me to make some for months. I was rather intrigued by the Red Velvet cake, so I decided to combine both. Most Red Velvet recipes call for food coloring, which I wasn't very keen on, so I used beets and beet juice. As you will see, I didn't use enough of it. The batter had a beautiful dark pink color. However once cooked, it turned to a rather brownish color. I was a bit disappointed. Next time I will use more beet juice!

Ingredients
2 cups all purpose flour
2 tablespoons cocoa powder (sifted)
2 teaspoons baking powder
½ teaspoon baking soda
1/2 cup unsalted butter softened
1 cup granulated sugar
1/4 cup beet juice and 1/4 cup beet puree
2 teaspoons vanilla
2 eggs
3/4 cup buttermilk

Frosting
1/3 cup icing sugar sifted
1 1/2 cup heavy cream
Dash vanilla (or your favorite flavor)

Directions
  1. Preheat oven to 375 degrees F;
  2. Combine the dry ingredients together in a bowl: flour, cocoa, baking powder and soda. Put aside.
  3. In a second bowl beat the butter and sugar with a mixer until fluffy.
  4. Add the eggs one at a time still beating, then the vanilla and the beets. You should have a very nice color.
  5. Add the dry ingredients then the buttermilk and mix until combined.
  6. Line up a muffin pan with paper liners. Scoop the batter into the liners.
  7. Bake about 20 minutes or until a toothpick comes out clean.
  8. Let them cool completely on a rack before putting any frosting.
  9. Look at the nice color they have:

  10. To Make Frosting: whip the cream and sugar just until stiff peaks form.
  11. Decorate the cooled cupcakes with the cream and sprinkles.


Saturday, February 8, 2014

Orange-Moka Brownies


This chocolate brownie, not too sweet, not too rich, and orange-coffee flavored is perfect for Valentine's or any occasion. Enjoy it for breakfast with Nutella spread. Yummy!
Oranges are so good this year, I am flavoring all my desserts with oranges. This is a quick and easy brownie recipe with a simple frosting to make when you're in a hurry.


Ingredients
5 square unsweetened melted chocolate (5 oz)
1 tablespoon cocoa powder
1 tablespoon instant coffee
2 tablespoons hot water
2 cups granulated sugar
1/2 cup vegetable oil
1 orange juice (1/2 cup) and zest (around 1 tablespoon)
4 eggs
3 cups all purpose flour
1 tablespoon baking powder
Icing
7 squares plain chocolate
1/2 cup icing sugar sifted
1/2 cup heavy cream

Directions
  1. Preheat oven to 375 degrees F;
  2. In a double boiler, melt the chocolate squares over low heat stirring from time to time. Let it cool
  3. Dissolve the coffee in the hot water.
  4. Butter and flour a 13 x 9-inch pan.
  5. Beat the sugar, oil and zest with a mixer. Add the melted chocolate and coffee. Mix well.
  6. Add the eggs, one at a time, and beat until the mixture is creamy and about double its initial size.
  7. Sift together the flour, cocoa powder and baking powder. Using a spatula, fold in the flour mixture delicately.
  8. Pour into the pan. Bake in the middle of the oven for about 25 minutes. The top of the cake forms a crust. Leave it in the pan until completely cool.
  9. To Make Frosting: heat the chocolate squares, icing sugar and cream in a saucepan over low heat stirring from time to time until the chocolate melts. Whisk to get a smooth mixture. Let it cool until it starts to thicken.
  10. Cut your brownies and add the frosting.
  11. Decorate with sprinkles.

Thursday, January 2, 2014

Salted Cod with Coconut Cream


Bacalhau is the Portuguese name for cod and refers to dried and salted cod. It is Portugal national dish.
Salting and drying meat and fish was the only method of preserving meat and fish until the artificial refrigeration began somewhere in the 19th century!

For a long time cod was caught exclusively off the shores of Newfoundland (North Atlantic coast) mainly by Portuguese, but also Spanish and Basque fishermen. It was widely available and affordable until the collapse of the cod stocks. The fish was salted and sun-dried ashore and was part of the basic Mediterranean diet. Before the advent of supermarkets you could see dried cods hanging by the tail in front of each grocery store.
Children loved to tear up pieces and eat them!
As you can imagine every country around the Mediterranean has more than one recipe to prepare the salted cod.

I have created my own baked recipe inspired by the Portuguese Bacalhau com Natas (Salted Cod with Cream.) It is a simplified version made with coconut milk and cream instead of dairy cream. If you're dairy-intolerant, this is an excellent alternative to cows' milk with the addition of the coconut's subtle sweetness.
It is very easy to make and the result is absolutely exquisite!

If you have never cooked Salted Cod, this is a simple and good recipe for a first try. I hope you will like it as much as I do!


Ingredients
1 pound salt cod fillets
2 pounds of potatoes, peeled and and sliced (I used Yukon Gold)
1 can (14 fl oz.) coconut cream
1 cup coconut milk
4 tablespoons unsalted butter
2 cups grated cheese (I used Jarlsberg)
Salt and pepper to taste


Directions
  1. Soak the salted cod fillets in water for 24 hours, changing water 2 or 3 times (rinse well and drain every time.) Keep the cod in the fridge.

  2. Parboil the cod for 5 minutes in water. Drain and let cool.
  3. In the meantime, peel, slice and parboil the potatoes for 5 minutes. Drain.
  4. Preheat the oven to 375 degF.
  5. Flake the fillets into small pieces, removing any bones and skin. Feel for the bones using your hands. Set aside.
  6. Butter an ovenproof dish generously. Layer half of the potatoes over the bottom. Top with the shredded cod evenly and add the remaining potatoes. Dont' worry if the potato slices break up. It won't affect the taste or the final look of the dish.

  7. Pour the coconut cream and milk over the potatoes distributing it evenly. It should almost cover the top layer of potatoes; Add more if necessary.
  8. Dot with pieces of butter. Place in the oven and bake for 20 minutes.
  9. Take out of the oven, sprinkle the grated cheese and bake for another 15 minutes or until it is slightly golden. After that time, if it hasn't browned, turn on the broil and grill for 5-8 minutes, keeping an eye in the oven to avoid burning it.
I hope you will enjoy it as much as we do!

Tips
  1. You should not need to add any salt to this dish. However, I suggest that you taste the cod and adjust the salt accordingly.
  2. You can use any cheese : Cheddar, Swiss, Emmenthal, Gruyere.
  3. You can substitute coconut cream for coconut milk. It will be slightly less rich tasting and have less fat.
  4. As far as buying coconut milk, I personally like to buy organic coconut cream and milk.
  5. You can use olive oil instead of butter.

Tuesday, December 31, 2013

Roasted Turkey Breast


It took me a couple of trials and errors to find out the secret of roasting a delicious turkey! It is super easy to prepare but you have to brine it overnight or at least for a few hours. It drastically improves the flavor. Brining is the process of soaking the meat in salty water.
We are only three in the family, so a whole turkey would last us for one month. I find the turkey breast is a great alternative. Even then we have turkey for 3 meals, which is not so bad compared to friends who complaint they eat leftovers for 2 weeks !
A turkey breast is also easier to brine as you need a pot large enough to cover the meat with the brine.


Ingredients
5-6 pound turkey breast (with bones and skin)
4 tablespoons unsalted butter, softened
3-4 garlic cloves crushed (1 tablespoon)
1 teaspoon thyme leaves

Brining
1 gallon cold water
1/2 cup salt
Combine the water, salt in a large pot. Stir to dissolve the salt.
Immerse the turkey breast, cover and refrigerate for 4-6 hours or overnight.
When you are ready to cook the meat, remove the turkey breast from the brine, rinse and pat dry.

Directions for cooking
  1. Preheat the oven to 450 degF.
  2. Mix the butter, garlic and thyme in a small bowl.
  3. Gently loosen the skin from the breast meat with your fingers and spread the garlic butter on the meat as shown on the picture.

  4. Spread the remaining evenly on the skin. Season the whole breast with pepper.
  5. Place the turkey breast, skin side up, in a roasting pan.
  6. Roast the turkey for half hour.
  7. Lower the temperature to 350 degF and continue cooking until the skin is golden brown and until an instant-read thermometer (or a meat thermometer) reads 165 degF when inserted into the thickest areas of the breast. To be sure test in 2-3 different places. It should take 1 to 1.5 hour long.
  8. When the turkey is done, cover with foil and let rest for 15 minutes before slicing.

Tips
  1. Preparation- bring it to room temperature before cooking.
  2. Cooking- If the skin is over-browning, cover it loosely with aluminum foil.
  3. Serving- while the turkey is resting, make a sauce : sauté, 1 or 2 french shallots (alternative : 1 oignon) and sliced mushrooms in a pan using the turkey drippings. Add few tablespoons of heavy cream or coconut cream. Spoon this sauce over the sliced turkey.

Sunday, December 29, 2013

Makroot A Looz (Almond Sweets)


This is a delicious traditional Algerian cookie, mostly served for special occasions.
There are many variations of Makroots or Makroods. In general they are cut in diamond shape and can be made of semolina dough stuffed with either almond meal or date paste.
This flourless version is made of thinly ground almonds, sugar, lemon zest and eggs. Its texture resembles that of marzipan all covered with bright icing sugar. It is a must-have wedding cookie.
Typically they are about one inch thick and 3 inches long , but I prefer a smaller size.
I like to make to make them at least once a year during the holidays, not only because my family loves them but because they are so easy and quick to make. 

The recipe I am providing is slightly different from the traditional one. It is tailored to my own taste.
If stored in a well sealed container, these 
cookies will keep for few weeks. 

Ingredients
3 cups almond meal
3/4 cup granulated sugar
1 egg white (with yolk reserved)
Zest and juice of 2 lemons
3 cups icing sugar
2-3 tablespoons cornstarch

Directions
  1. Pre-heat the oven at 350 degF
  2. Mix the almonds, granulated sugar and lemon zest in a bowl
  3. Make a well and add the egg white. Mix with a spoon or fork. The almond dough should hold well together (not too dry, not too runny.) If you find that it still breaks apart, then add 1 teaspoon of egg yolk at a time
  4. Separate the dough in 2 or 3 portions (whatever is easy for you to work with).
  5. Sprinkle work surface with cornstarch so the dough doesn't stick to your working surface. Roll out each piece into a ¾ inch thick rope and press gently with your palm. Cut in a diamond shape.
  6. Finish shaping the diamonds one by one by hand, pressing the edges and place on a cookie sheet lined with parchment paper.
  7. Bake 12-14 minutes. Let cool completely.
  8. Prepare three bowls that are wide enough to dip the cookies easily.
  9. Pour the lemon juice in bowl #1. Separate the confectioner’s sugar into bowls #2 and #3. This is because the first sugar bowl will get lumpy after the first dipping. To have a nice white finish, you have to dip it into a dry batch.
  10. Lightly dip each cookie in the lemon juice (#1) then toss into the icing sugar (#2). Coat well and pat to remove the excess.
  11. Place on a cookie sheet and repeat the operation for all the cookies.
  12. Coat a second time with the icing sugar in bowl #3 to get a nice snow white color.
  13. Place on the cookie sheet and let dry.

Variations
  1. You may replace the lemon juice with orange blossom water or homemade syrup.

Monday, December 23, 2013

Panettone


First attempt at Loretta Sebastiani recipe.

It took time and patience to do it, but the weather contributed a lot. It was and still is extremely cold, so the only thing you want to do is to stay warm inside, near the oven! I read Loretta's recipe 2-3 times before trying it. The steps were clear, the tips very helpful, nothing was missing.

I prepared my yeast on Friday evening and put it the oven not heated, without the light on. Just before going to bed, I checked it and it was rising nicely. However in the morning it was all flattened. I was going to throw it away and then I decided to go ahead with the next step and see if I could recover it. It worked perfectly.

I used a "Charlotte" mold, which I covered with wax paper. My husband is not a big fan of candied fruits and raisins, so I used only 1/3 cup of raisins that I soaked in orange blossom water.


You will find a lot of tips at Loretta's blog.


Ingredients
3 cups all-purpose flour plus more for dusting
2 teaspoons of instant dry yeast
1/2 cup unsalted butter
2 eggs
1 yolk
1/2 cup sugar
1/4 cup (1.4 ounces) assorted candied fruit
1/3 cup raisins
1 tablespoon orange blossom water to soak the raisins(or plain water or rum)
3/4 cup water

Mold: 7in diameter and 4in high


Directions
Step 1: the day before
  1. Mix 1/3 cup of flour and 1 teaspoon of instant yeast.
  2. Add 1/4 cup water and mix well. Dissolve all the lumps well with your fingers until a smooth dough. Cover and let rise all night. I store it in the oven.

Step 2: next morning-9am
  1. The volume should have more than doubled. Don't worry if it has flattened.
  2. Add 1/2 cup of flour and knead the dough for few minutes. If it's too sticky, add 1-2 tablespoons of flour.
  3. Transfer the dough into a larger bowl.
  4. Cover the bowl and let it rise. I put it in the oven with the light on for 4 hours. The light keeps the oven just warm enough to help the dough rise.
  5. Take the butter out of the fridge.
Step 3: afternoon - 12pm
  1. In a saucepan, dissolve the sugar in 1/2 cup water. Let it simmer around 20 minutes on a low heat and reduce to obtain a light syrup. Let it cool.
  2. Soak the raisins in warm liquid until soft (I put them in the microwave for 30 seconds).
Step 4: afternoon - 1pm
  1. Beat the eggs and yolk and add the cooled syrup beating continuously.
  2. Drain the raisins and flour them so they don't stick together. If you are using candied fruits, use the same technique.
  3. Line the bottom and sides of your mold with buttered parchment paper.
  4. Put remaining flour and the second teaspoon of yeast in the dough machine and mix well.
  5. Add the dough prepared in step 1 and 2, and the butter. If the butter is not soft enough, microwave it for 10-20 seconds.
  6. Turn the machine on.
  7. Pour in the egg and syrup mixture.
  8. Knead for 10-12 minutes.
  9. Add the raisins and candied fruits and knead another 2 minutes.
  10. The dough should be soft.
  11. Transfer to the mold and let it rise. Again I put it in the oven with the light on. It should reach the edge of the mold.
Step 5: afternoon - 4pm
  1. Pre-heat the oven at 400 degF.
  2. Bake 30 minutes then lower the heat to 350 degF and bake another 10 minutes.
  3. Let it cool, transfer to a plate and dust the surface with sifted icing sugar.