Tuesday, December 31, 2013

Roasted Turkey Breast


It took me a couple of trials and errors to find out the secret of roasting a delicious turkey! It is super easy to prepare but you have to brine it overnight or at least for a few hours. It drastically improves the flavor. Brining is the process of soaking the meat in salty water.
We are only three in the family, so a whole turkey would last us for one month. I find the turkey breast is a great alternative. Even then we have turkey for 3 meals, which is not so bad compared to friends who complaint they eat leftovers for 2 weeks !
A turkey breast is also easier to brine as you need a pot large enough to cover the meat with the brine.


Ingredients
5-6 pound turkey breast (with bones and skin)
4 tablespoons unsalted butter, softened
3-4 garlic cloves crushed (1 tablespoon)
1 teaspoon thyme leaves

Brining
1 gallon cold water
1/2 cup salt
Combine the water, salt in a large pot. Stir to dissolve the salt.
Immerse the turkey breast, cover and refrigerate for 4-6 hours or overnight.
When you are ready to cook the meat, remove the turkey breast from the brine, rinse and pat dry.

Directions for cooking
  1. Preheat the oven to 450 degF.
  2. Mix the butter, garlic and thyme in a small bowl.
  3. Gently loosen the skin from the breast meat with your fingers and spread the garlic butter on the meat as shown on the picture.

  4. Spread the remaining evenly on the skin. Season the whole breast with pepper.
  5. Place the turkey breast, skin side up, in a roasting pan.
  6. Roast the turkey for half hour.
  7. Lower the temperature to 350 degF and continue cooking until the skin is golden brown and until an instant-read thermometer (or a meat thermometer) reads 165 degF when inserted into the thickest areas of the breast. To be sure test in 2-3 different places. It should take 1 to 1.5 hour long.
  8. When the turkey is done, cover with foil and let rest for 15 minutes before slicing.

Tips
  1. Preparation- bring it to room temperature before cooking.
  2. Cooking- If the skin is over-browning, cover it loosely with aluminum foil.
  3. Serving- while the turkey is resting, make a sauce : sauté, 1 or 2 french shallots (alternative : 1 oignon) and sliced mushrooms in a pan using the turkey drippings. Add few tablespoons of heavy cream or coconut cream. Spoon this sauce over the sliced turkey.

Sunday, December 29, 2013

Makroot A Looz (Almond Sweets)


This is a delicious traditional Algerian cookie, mostly served for special occasions.
There are many variations of Makroots or Makroods. In general they are cut in diamond shape and can be made of semolina dough stuffed with either almond meal or date paste.
This flourless version is made of thinly ground almonds, sugar, lemon zest and eggs. Its texture resembles that of marzipan all covered with bright icing sugar. It is a must-have wedding cookie.
Typically they are about one inch thick and 3 inches long , but I prefer a smaller size.
I like to make to make them at least once a year during the holidays, not only because my family loves them but because they are so easy and quick to make. 

The recipe I am providing is slightly different from the traditional one. It is tailored to my own taste.
If stored in a well sealed container, these 
cookies will keep for few weeks. 

Ingredients
3 cups almond meal
3/4 cup granulated sugar
1 egg white (with yolk reserved)
Zest and juice of 2 lemons
3 cups icing sugar
2-3 tablespoons cornstarch

Directions
  1. Pre-heat the oven at 350 degF
  2. Mix the almonds, granulated sugar and lemon zest in a bowl
  3. Make a well and add the egg white. Mix with a spoon or fork. The almond dough should hold well together (not too dry, not too runny.) If you find that it still breaks apart, then add 1 teaspoon of egg yolk at a time
  4. Separate the dough in 2 or 3 portions (whatever is easy for you to work with).
  5. Sprinkle work surface with cornstarch so the dough doesn't stick to your working surface. Roll out each piece into a ¾ inch thick rope and press gently with your palm. Cut in a diamond shape.
  6. Finish shaping the diamonds one by one by hand, pressing the edges and place on a cookie sheet lined with parchment paper.
  7. Bake 12-14 minutes. Let cool completely.
  8. Prepare three bowls that are wide enough to dip the cookies easily.
  9. Pour the lemon juice in bowl #1. Separate the confectioner’s sugar into bowls #2 and #3. This is because the first sugar bowl will get lumpy after the first dipping. To have a nice white finish, you have to dip it into a dry batch.
  10. Lightly dip each cookie in the lemon juice (#1) then toss into the icing sugar (#2). Coat well and pat to remove the excess.
  11. Place on a cookie sheet and repeat the operation for all the cookies.
  12. Coat a second time with the icing sugar in bowl #3 to get a nice snow white color.
  13. Place on the cookie sheet and let dry.

Variations
  1. You may replace the lemon juice with orange blossom water or homemade syrup.

Monday, December 23, 2013

Panettone


First attempt at Loretta Sebastiani recipe.

It took time and patience to do it, but the weather contributed a lot. It was and still is extremely cold, so the only thing you want to do is to stay warm inside, near the oven! I read Loretta's recipe 2-3 times before trying it. The steps were clear, the tips very helpful, nothing was missing.

I prepared my yeast on Friday evening and put it the oven not heated, without the light on. Just before going to bed, I checked it and it was rising nicely. However in the morning it was all flattened. I was going to throw it away and then I decided to go ahead with the next step and see if I could recover it. It worked perfectly.

I used a "Charlotte" mold, which I covered with wax paper. My husband is not a big fan of candied fruits and raisins, so I used only 1/3 cup of raisins that I soaked in orange blossom water.


You will find a lot of tips at Loretta's blog.


Ingredients
3 cups all-purpose flour plus more for dusting
2 teaspoons of instant dry yeast
1/2 cup unsalted butter
2 eggs
1 yolk
1/2 cup sugar
1/4 cup (1.4 ounces) assorted candied fruit
1/3 cup raisins
1 tablespoon orange blossom water to soak the raisins(or plain water or rum)
3/4 cup water

Mold: 7in diameter and 4in high


Directions
Step 1: the day before
  1. Mix 1/3 cup of flour and 1 teaspoon of instant yeast.
  2. Add 1/4 cup water and mix well. Dissolve all the lumps well with your fingers until a smooth dough. Cover and let rise all night. I store it in the oven.

Step 2: next morning-9am
  1. The volume should have more than doubled. Don't worry if it has flattened.
  2. Add 1/2 cup of flour and knead the dough for few minutes. If it's too sticky, add 1-2 tablespoons of flour.
  3. Transfer the dough into a larger bowl.
  4. Cover the bowl and let it rise. I put it in the oven with the light on for 4 hours. The light keeps the oven just warm enough to help the dough rise.
  5. Take the butter out of the fridge.
Step 3: afternoon - 12pm
  1. In a saucepan, dissolve the sugar in 1/2 cup water. Let it simmer around 20 minutes on a low heat and reduce to obtain a light syrup. Let it cool.
  2. Soak the raisins in warm liquid until soft (I put them in the microwave for 30 seconds).
Step 4: afternoon - 1pm
  1. Beat the eggs and yolk and add the cooled syrup beating continuously.
  2. Drain the raisins and flour them so they don't stick together. If you are using candied fruits, use the same technique.
  3. Line the bottom and sides of your mold with buttered parchment paper.
  4. Put remaining flour and the second teaspoon of yeast in the dough machine and mix well.
  5. Add the dough prepared in step 1 and 2, and the butter. If the butter is not soft enough, microwave it for 10-20 seconds.
  6. Turn the machine on.
  7. Pour in the egg and syrup mixture.
  8. Knead for 10-12 minutes.
  9. Add the raisins and candied fruits and knead another 2 minutes.
  10. The dough should be soft.
  11. Transfer to the mold and let it rise. Again I put it in the oven with the light on. It should reach the edge of the mold.
Step 5: afternoon - 4pm
  1. Pre-heat the oven at 400 degF.
  2. Bake 30 minutes then lower the heat to 350 degF and bake another 10 minutes.
  3. Let it cool, transfer to a plate and dust the surface with sifted icing sugar.


Friday, November 8, 2013

Tamina


Tamina (pronounce it ta-mee-na) is an Algerian sweet usually served to celebrate a birth. It is very easy to make and uses ingredients found in every Algerian household : semolina, honey and butter. The semolina must be roasted. My mother always had few cups toasted as a backup, in case some unexpected guests showed up and she had nothing to welcome them with. She would then melt butter and honey, add some roasted semolina and there she had something to offer to her guests in less than 5 minutes! 
The choices for decoration and flavoring are endless. You may decorate with spices, almonds, pistachio, or other cake decorating sprinkles.

Ingredients
1 cup (220g) coarse semolina
½ cup (110g) butter
1/3 cup (110g) honey (or a little less)
Cinnamon to decorate

Directions
  1. Fry dry the semolina in a frying pan over low heat, stirring with a wooden spoon until it’s golden (15-20 minutes).
  2. Melt the butter and honey in a saucepan over low heat.
  3. Add the semolina, stir thoroughly for 3-5 minutes. The mixture must be fluid but not too runny. Note that it thickens slightly when cool.
  4. Remove from heat. Pour in small plates. Smooth the top and decorate with cinnamon.

Wednesday, October 16, 2013

Rustic Triangle Bread


At one point in time I was making fresh bread almost every day. I would make the dough during the week-end, cook one loaf or two the same day. I would shape the remaining dough in small balls, floured and threw them in ziplock bags in the fridge. Every evening, as soon as I get home from work I would take a couple of balls, shape them as naan breads and let them rise, while I start my supper. Just half hour later they are ready to be baked and in no time they were on the table. Having fresh bread on the table at every meal is wonderful!
We were eating too much bread and I was using only all-purpose flour, which is not the healthiest flour! So I started experimenting with various flour combinations. I have to say when you are used to eat light and fluffy white bread, it’s difficult to switch to“harder” flour overnight; you have to introduce them progressively. But I think I am getting there.
Here is a recipe that makes beautiful and tasty bread.
I used a stand mixer to prepare the dough.


Ingredients
Starter
½ cup all whole wheat flour
½ cup rye flour
1 teaspoon instant yeast
1 cup room temperature water

Dough
2 cups all purpose flour
1 cup spelt flour
2 teaspoons salt
2 teaspoons brown sugar
2 teaspoons instant yeast
½ cup luke warm water
1 tablespoon olive oil

Directions
    Step 1
  1. Mix all the starter ingredients. Let the starter rise until it doubles volume (1-1.5 hours). Note that the rising duration depends a lot on the ambient temperature.

  2. Step 2
  3. Put all the dry dough ingredients in the dough machine and mix well.
  4. Add the starter.
  5. Turn the machine on.
  6. Add the water little by little. The dough should be moist. If it is too hard add 1 or 2 tablespoon of water.
  7. Knead for 13 minutes.
  8. Cover and let it rise for 1 hour or until it doubles volume.
  9. Tap it down to release air. You will obtain a flatten dough
  10. Roll up the dough into a log of around 20 inches long.
  11. Flatten it to approximately 1 inch then cut 10 triangles for medium pieces.
  12. Let rise for another 45 minutes.
  13. Make some steam by adding water to a hot baking dish that you place in the lower rack of the oven. This will help keep the bread moist.
  14. Spray with water and bake 25 minutes in a 450F pre-heated oven.

Monday, September 23, 2013

Oatmeal Raisin and Walnut Cookies


It's the most requested oatmeal cookie recipe at the office. These cookies are good for any occasion. The walnut give them just enough crunch to make them fancy.

Ingredients
¼ cup butter softened or margarine
3/4 cup brown sugar
1/4 cup white sugar
2 eggs, beaten
1 teaspoon vanilla
1.5 cup oatmeal
1 cup flour
1 teaspoon baking soda
A pinch of salt
¼ cup raisins
½ cup chopped walnuts
2 tablespoons water


Directions
  1. Preheat oven to 350 degrees F.
  2. Soak the raisins in the water. Cover and microwave for 20 seconds.
  3. In a large bowl or in the bowl of an electric mixer, beat the butter, sugar, eggs and vanilla until creamy.
  4. In a separate bowl, whisk the flour, baking soda and salt. Add to the creamy mixture.
  5. Stir in the oats, raisins and walnuts and mix well.
  6. Drop teaspoons of dough onto ungreased cookie sheet (or parchemin lined) around 2 inches apart.
  7. Use a wet napkin to flatten slightly.
  8. Bake for 10-12 minutes or until the cookies are golden.
  9. Let cool around 2 minutes on the cookie sheet then transfer to wire racks to cool.

Saturday, September 21, 2013

Potato-stuffed tomatoes


During summer, I love to cook without meat. Stuffed vegetables are my favorite: tomatoes, peppers, zucchinis, eggplants. Usually I make stuffed tomatoes at least twice during the season. Most of the people would bake them  for 30-45 minutes, but I like them well cooked, slightly caramelized, so they are not acidic. Sometimes I let them bake for more than 3 hours.  The day after the taste is even better. Like most vegetarian dishes the more they are re-heated the better they taste. This is my mother’s recipe and all my family loves it! I hope you will love it too.

Ingredients
9 medium ripe tomatoes
4 medium hashed potatoes (around 4 cups)
1 egg
2 garlic cloves crushed
Salt and pepper to taste
1 tablespoon parsley ciseled

1/8 cup butter (1 ounce or 2 tablespoons)
2 tablespoons olive oil + extra for drizzling
4 cups shredded cheese (gruyere, emmenthal or Jarlsberg)
5-6 basil leaves

Directions
Preparing the tomatoes and the sauce
  1. Cut the top of the tomatoes leaving an inch. Scoop out the pulp and put in a pan over medium heat. Try to remove most of the seeds. Salt and invert the tomatoes on a large plate and let it drain.
  2. Cook the pulp over medium heat to make a sauce (around 20 minutes). Season with salt and pepper.
  3. Pass the sauce through a moulinette or a sieve to remove the seeds add the basil leaves and set aside.

Preparing the stuffing
  1. While the tomatoes are draining and the sauce is cooking, shred the potatoes in a food processor, and cook in the microwave for 3-4 minutes or until just tender.
  2. Remove and transfer to a large bowl. Add the salt, pepper, garlice and butter and stir to melt.
  3. Add the cheese, egg and parsley. Mix well.

Putting everything together
  1. Pre-heat the oven to 400 degrees F.
  2. Stuff the tomatoes, cover with the top and place in a shallow baking dish generously oiled.
  3. Sizzle more olive oil on the tomatoes.
  4. Bake 80-90 minutes or until most of the liquid is evaporated and the tomatoes start to caramelize. Lower the oven to 350 degrees F.
  5. Add 2 cups of the tomato sauce and cook another 30-45 minutes.

Note: if the liquid is evaporating too fast, lower the oven earlier and add the tomato sauce.

Tuesday, September 10, 2013

Kamut Bread


Kamut is an ancient grain that has been rediscovered not a long time ago. Its exact origin is unknown. One story says the grain was found in the tombs of the ancient Egyptian Pharaohs, hence the nickname "King Tut's Wheat ». Another hint is that "Kamut," or rather, "K-M-T" (pronounced with vowels elided) was the hieroglyphic designation for ancient Egypt.There are many other stories surrounding the name and the origin of the kamut wheat.

Some nutrition facts :
The grain itself is very high in protein. It also contains a high mineral concentration especially in selenium, zinc, and magnesium. This grain variety is considered a high energy wheat, and provides the body with more energy in the form of complex carbohydrates. Because of its low oxidation levels it loses little nutritional content when being ground and processed. Even though this wheat variety contains gluten, it has been found to be more easily digestible by people who may have slight allergic tendencies : Wikipedia


 For my first try, I wanted to make just one loaf with 50% kamut flour and 50% all purpose flour, but I made a mistake. I put twice as much liquid than I should have in the dough (frankly I don’t know where my head was). The dough ended up looking like a cake batter! I added around 1/3 cup all purpose flour, but it was still too soft to handle so I literally poured it in a bread pan like a cake. The bread turned out beautiful and very good! As you can see it has a creamy color.  My photographer couldn't resists tasting it before taking the picture!
 I used a stand mixer to prepare the dough. Here are the ingredients.

Ingredients
Starter
½ cup all purpose flour
½ cup kamut flour
1 teaspoon instant yeast
2/3 cup water

Dough
½ cup all purpose flour
½ cup kamut flour
1 tsp instant yeast
1 tbsp brown sugar
1 tsp salt
1 tbsp margarine
1/4 cup warm milk

Directions
  1. Mix all the starter ingredients. Let the starter rise until it doubles volume (around 2 hours).
  2. Put all the dough ingredients, except the milk, in the dough machine.
  3. Add the starter.
  4. Turn the machine on.
  5. Add the milk if necessary, little by little. The dough should be moist.
  6. Knead for 10 minutes.
  7. Cover and let it rise for 1 hour.
  8. Punch it down to release air.
  9. Shape it and let rise for another 45 minutes.
  10. Bake 30 minutes in a 400F oven

Friday, September 6, 2013

Cheesy Zucchini Gratin


What I like about this dish is its simplicity. It’s perfect as a side dish for meat and a good way to get kids to eat more vegetables! The trick is to put more cheese on top and there you go.
I have zucchinis in the garden in summer time, so they are on the menu every other day. The zucchinis are light, high fibre and they are available all year long at a very good price.
This dish is ideal for weekday’s menu: it's ready in no time.
The zucchinis contain a lot of liquid so draining them is not enough. You have to dry them to avoid having a soggy dish. I usually put them in a pan on medium heat for around 10 minutes, but you can get around this step by adding 1 tablespoon of flour to the cream to absorb the excess liquid. In this case you do not have to dry them and therefore you save 10 minutes! Personally, I rather dry them.


Ingredients
2 lb zucchinis sliced
1.5 cup heavy cream
3 eggs
3 cups shredded cheese (gruyere or emmenthal or Jarslberg)
Salt and pepper to taste

Directions
  1. Preheat the oven to 400F
  2. Steam the zucchinis until cooked to taste.
  3. Drain and put in skillet on medium heat to dry.Don’t forget to watch them, you don’t want them burnt. You want to eliminate as much liquid as possible to avoid having a soggy dish.
  4. In the meantime, beat the eggs in a bowl.
  5. Add the cream and cheese. Mix well.
  6. Add seasoning.
  7. Transfer the zucchinis to an 8x10-inch baking dish.
  8. Pour ¾ of the cream mixture on zucchinis and combine.
  9. Spread the remaining ¼ cream evenly on top to make up the gratin crust.
  10. Bake 20-30 minutes or until golden brown.

Sunday, August 25, 2013

Blueberry Pie


This is my first attempt and I must say it was a hit! 

Ingredients
Dough
3 cups flour
2 tablespoon sugar
¾ cup butter (softened)
5 tablespoons shortening
8-10 tablespoons water

Filling
6 c blueberries
1 cup sugar
3 tablespoons cornstarch
½ lemon: zest and juice (3 tablespoons)
2 tablespoons granulated sugar to sprinkle

Instructions
  1. Combine the flour, sugar, butter and shortening to obtain something like a coarse cornmeal.
  2. Sprinkle the water, one tablespoon at a time and mix just enough for the mixture to hold together and turn into a smooth dough. Add more water if needed.
  3. Divide the dough in 2 pieces, wrap in plastic and refrigerate for 15-20 minutes.
  4. Combine the blueberries, sugar, cornstarch and lemon juice and zest in a bowl.
  5. Let it sit for ½ hour.
  6. Preheat the oven at 500 degF
  7. Remove the dough from the refrigerator.
  8. Sprinkle work surface with flour. Roll out one piece of the dough into a 9 inch circle using a rolling pin and sprinkling with flour. Roll the dough over the rolling pin, and unroll it onto the pie pan. Press gently.
  9. Roll out the second piece of dough into a rectangle and cut into 8 strips.
  10. Spread the blueberry filling on the pie crust.


  11. Place the strips to form a lattice as shown in the picture. Press the strips against the crust and tuck them in. Cut any excess dough.


  12. Sprinkle with sugar.

  13. Place the pie on a baking sheet. Bake 25 minutes at 425, then lower temperature to 375 and bake another 25 minutes. It should be bubbling that's why it is recommended to place it on a baking sheet. I didn't follow the advice so the bottom of my oven was splashed a little bit.

  14. The crust should be dark brown

  15. Let it cool until barely warm. Cut yourself a slice and enjoy!


Tuesday, August 20, 2013

Strawberry Sorbet


Yet another sorbet. It was so hot when I served the sorbet to take the picture. By the time the camera was ready, it was already melting! 

Ingredients
2 lbs strawberries
1 1/2 cups granulated sugar
1/3 cup water
1 lemon juice

Directions
  1. Stir sugar and water together over medium heat in a large saucepan until sugar has dissolved.
  2. Add the strawberries and stir to combine. Remove from the heat.


  3. Allow to cool a little bit then blend until the mixture is smooth.


  4. Add lemon juice and stir.
  5. Refrigerate mixture until cold.
  6. Freeze in ice cream maker for 25-30 minutes or per machine directions.
  7. Enjoy!


Notes:
  1. The quantities used yield 6 cups of strawberry mixture, so if your ice cream maker, like mine, can only hold 4 cups then you need to make 2 passes.
  2. If you don't have an ice cream maker, put the mixture in the freezer and mix every hour or so until frozen.

Thursday, August 1, 2013

Peach Sorbet


The last thing you want to do when it’s hot and sticky is to turn your oven on. A sorbet is the only thing I can think about and it is so refreshing. It is quick and so easy to make. It took me at most 10 minutes to make.
The proportions I gave are based on my taste, but you can adapt them to yours by putting more or less sugar ( is you are calorie conscious), or putting more or less lemon juice. Taste and adjust.

I usually prefer using fresh fruits, but good peaches are not in-season yet in my area. If you are using fresh fruits, make a syrup and cook them 5 minutes peeled and sliced. Cool before blending.

Ingredients
1 28 fl oz can peaches with syrup (roughly 4-5 peaches)
½ c sugar
1 lemon juice

Directions
Blend everything together into a smooth puree with a hand mixer or a food processor.

Freeze in the ice maker for 25-30 minutes. 

Tuesday, July 30, 2013

Cardamom Lemon Chocolate Marble Cupcakes


My daughter made these cupcakes for a weekday get together with friends. They came out just beautiful with swirls of chocolate. That was perfect, no need to top them for decoration which would take a bit longer.


Ingredients 
1 stick unsalted butter
1 cup granulated sugar
1/2 tsp salt
3 eggs
1 tsp vanilla
2 cups all-purpose flour
2 tsp baking powder
2/3 cup buttermilk
1/4 cup cocoa powder
Zest of one lemon
2 tsp ground cardamom

Note: If you don't have buttermilk, you can make a great replacement by mixing a tablespoon of white vinegar per 1/2 cup of milk and leaving it on the counter for 20 minutes.

Directions 

  1. Preheat oven to 325 degF. Line a muffin pan with paper cupcake liners. 
  2. Mix the flour, baking powder and salt in a bowl.
  3. In another bowl, mix the cocoa powder with 2 tablespoons of hot water until it forms a smooth liquid paste.
  4. Beat the butter and sugar together in a stand or hand mixer until smooth and airy.
  5. Add the eggs one at a time, and the vanilla, and beat until the mixture is well combined.
  6. Add the flour mix and the buttermilk little by little, each time beating the batter until it is smooth.
  7. Put 1/2 of the batter in a separate bowl and add the cocoa to it. Mix well until well combined.
  8. Add the lemon zest and the cardamom to the other 1/2 of the batter and combine.
  9. Put one spoonful of the lemon/cardamom batter in the bottom of each mold and top it off with a spoon of the chocolate mixture.
  10. Cook for 12 minutes for small cupcakes, and 16 minutes for muffin-sized ones.
  11. Let cool fully in the pan before removing.


Friday, July 19, 2013

Pineapple Sorbet


So easy you won't want to think twice about making it. The hardest part is not eating it before it freezes!  And you don't even need a ice cream maker! Here is the step by step recipe in pictures.

Ingredients
2 * 19 oz cans of pineapple chunks in juice
2 oz of white rum (optional)


Directions
Blend the two cans of pineapple until they are slightly fluffy


Add the rum. This helps the sorbet to stay smooth and stops crystallization. Mix.

Put in the freezer and mix every hour or so until frozen.

Monday, July 1, 2013

Easy Cherry Sponge Cake


Another easy and quick recipe : 10 minutes to make, 20-25 minutes to bake. This cake contains almost no butter. I have used cherries but it can be made with any other fruit, whatever you have in your pantry. Because I didn’t use a lot of cherries (not everyone in the family is a big fan), I added a crème pâtissière (pastry cream) to be served on the side to add more moisture.

Ingredients
Sponge Cake
2 eggs
1/2 cup granulated sugar
1/3 cup all purpose flour
2 tablespoons corn starch
½ teaspoon baking powder
3 tablespoons luke warm water
1 tablespoon dark rum
9 inch savarin mold (or a regular pan)
Butter for the pan
2 tablespoons icing sugar for decoration
½ Lb pitted cherries

Crème pâtissière (optional)
1-1/4 cup milk
1 egg
¼ cup sugar
2 tablespoons corn starch (or flour)
1 tablespoon cocoa
1-2 tablespoons of rum (or more)

Directions
Sponge Cake
  1. Preheat oven to 375 degrees F;
  2. In a large bowl (or a stand-up mixer) beat the eggs to obtain a pale yellow color.
  3. Gradually add the sugar while still beating. Add the water and rum and mix few more seconds.
  4. Mix the flour, starch and baking powder together then gradually add to the egg mixture while still beating. The batter is just a little bit thicker than the pancake batter.
  5. Butter the mold and pour in the batter.
  6. Add the fruits on top.
  7. Bake at 400 degrees F (200 degrees C) for 5 minutes, then turn down the oven to 375F and continue cooking for another 20 minutes.
  8. Poke the middle of the cake with a skewer to check if it’s done. If it comes out clean, the cake is ready.
  9. Let it cool, transfer to a plate and dust the surface with sifted icing sugar.

Please have a piece!

Crème pâtissière
While the cake is cooking, heat the milk in the microwave. Whisk the egg and sugar in a saucepan until thick, then stir in the corn starch or flour. Pour the hot milk onto the egg while still whisking. Put the saucepan over medium heat and stir until it the cream thickens. Remove from the heat, add the rum and cover. Serve the cake warm or cold with the crème pâtissière on the side.

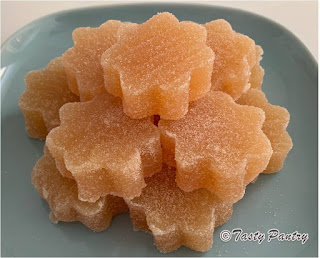
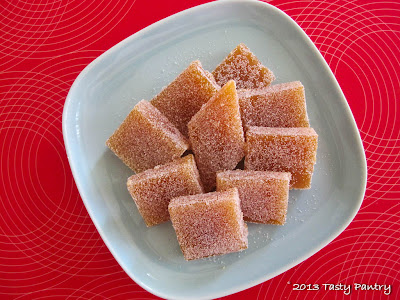
Pâte de Coings (Quince Paste)


Quince paste is one of the delicacies for which each woman in my family prides to have the best recipe. For me my Auntie was always the winner. The criteria for best quince paste are simple: translucent and pale yellow paste. As you can see I am not there yet!...
The quince has a green/yellow color and a very delicate fragrance. I don’t know any other way to eat it other than sweet in marmalade, jam or jellied like in this recipe.
Sorry I forgot to take a picture of the fruit before cooking it, but you can google it and you will find a lot of pictures. 


Ingredients
3 quinces
1-1/3 cup sugar
2 tablespoons lemon juice

Directions
  1. Wash the quinces and scrub with paper towel. Remove any stems. 
  2. Steam until soft. I steamed mine in a pressure cooker for 35 minutes. Let the quincies cool a little bit then peel, remove the seeds and any fibrous parts. It’s preferable to do it while they are still warm.
  3. Weigh, then puree in a blender or hand mixer.
  4. Use the same weight in sugar (around 1-1/3 cup).
  5. Combine the pureed fruits, sugar and lemon juice in a saucepan.
  6. Stir continuously until the until the sugar is dissolved and the paste comes off the sides of the saucepan.
  7. Pour in a shallow dish (1/2 inch or so) and leave it to dry for few days in a dry area. After one week it should be dry enough.
  8. Cut into pieces the size and shape you want and roll in granulated sugar.


Monday, June 24, 2013

Tchouktchouka (shakshuka)


Tchouktchouka or shakshuka is a traditional North African dish. Every region has a slightly different pronunciation and every household its own version. Some recipes will include potatoes and/or cumin and paprika to create a main dish. But what they all have in common is that special smoky flavor of roasted peppers, which is the foundation of this dish. 

This dish reminds me of summer! The recipe I am giving here can be served as tapa, or cold as a first course with a drizzle of balsamic vinegar, or hot as a main course to accompany BBQ meat. Top it with eggs and it will make a very good breakfast.

In this version, I used harissa, a Tunisian hot pepper paste used in North African cooking. It adds a little spice to the dish. If you can't find it, you can replace it with hot pepper flakes. I also used fresh basil, which is not traditional, but really my spin on this recipe.
The dish was topped with eggs to serve as a main meal for a light lunch.
I like using left over in pita bread as sandwiches.

Tchouktchouka is a simple dish but it requires some preparation: roasting the peppers. You can use jarred roasted peppers, but these are usually preserved in a brine which reduces the smoky flavor unless you find a less acidic brand.
Roasting your peppers is definitely the best way to get good results. The instructions are provided below.

By the way, you can use any color of peppers, but I like the red ones because they are sweeter.

Usually, during pepper season, when fresh peppers are not very expensive, I buy buckets of peppers and roast them on the BBQ. Then I freeze them in small quantities.

If I run out of frozen roasted peppers during winter, I buy a couple of fresh peppers and roast them in the oven under the grill.


Ingredients
  • 3 tablespoons olive oil
  • 1 tablespoon sliced garlic
  • 8 peppers roasted, peeled, seeded and diced
  • 3 tomatoes peeled, seeded and diced
  •  ½ teaspoon harissa (the quantity is up to you. You may omit it all together)
  • Salt, pepper to taste
  • 6 basil leaves
  • 3 eggs
Note: you can replace harissa with hot pepper flakes

Directions
  1. Saute the garlic in olive oil around 2 minutes at low heat in a skillet.
  2. Add the harissa and the tomatoes.
  3. Cook the tomatoes until they start melting around 10-15 minutes.
  4.  Add the peppers with their juice, salt and pepper. Mix, cover and cook on low heat until all the juices are absorbed, around ½ hour.
  5. Add the basil and simmer another 2-3 minutes.
Variations
  • If you want a complete meal like me add the eggs when the Tchouktchouka is almost cooked and let simmer until the eggs set.
  • If you serve it as a tapa, don’t forget to have bread and olives to go with it.
  • If you like cumin, add ½ teaspoon of ground cumin in step 2.
Before adding the eggs


Roasting the peppers
  • If using the BBQ : place the peppers directly on the grill
  • If using the oven broil: place the peppers on a cookie sheet covered with foil. Place the sheet very close to the broil.
  1. Turn as soon as the skin turns black and blisters. It should take between 5-7 minutes on each side, but check them out more frequently. 
  2. Place in a container and cover (pot, bowl, anything) for minimum ½ hour or until the peppers are cool enough to handle. The key is to cover to allow for the peppers to sweat and the skin to start separating from the flesh. 
  3. Peel the skin off the peppers using your fingers, it should come off easily. Remove the stem and seeds. Dice the peppers and set aside. 

Sunday, June 23, 2013

Gratin de Pommes de Terre (Creamy Potatoes Gratin)


This is a classic French dish that can be served as a main meal or as an accompaniment to any type of roast. We had some this Saturday night as a main meal with a large salad on the side, a mix of lettuce and radish greens from the garden, and of course French bread.
Gratin refers to the golden crust on top of a dish. There are as many recipes for this dish as there are regions in France. The recipe I chose today uses béchamel sauce. It is creamy and cheesy and easy to make. You don’t even need to pre-cook the potatoes. Slice the potatoes as thinly as you can so the cooking time will be shorter.
The only difficulty to this recipe is the béchamel sauce. Few tips: heat the milk and incorporate a little at a time into the flour and butter. If you still end up with a lumpy sauce, use a hand blender to thin it.
Serve the gratin potatoes in its baking dish.


This recipe should serve 3 if you have it as a main course.

Ingredients
2 lb. yellow flesh potatoes, peeled and sliced thinly
3 cups warm milk
3 tablespoons flour
¼ cup butter
Salt and pepper (optional: nutmeg to taste)
4 cups shredded cheese (Gruyere, Emmental or Jarlsberg)
2 eggs

Directions
Preheat the oven to 375F

Make a Béchamel sauce
  1. Melt half the butter in a large saucepan.
  2. Whisk the flour and cook few minutes on low to medium heat.
  3. Remove from heat and gradually add the milk, continuously whisking until the mixture is smooth.
  4. Return to heat and cook 3-4 minutes more, still stirring.
  5. Add seasoning. Remove from heat, stir in 3 cups cheese and mix well.

Assembling the Gratin
  1. Take an ovenproof gratin dish and grease it with a little bit of the butter.
  2. Layer half the potatoes, slightly overlapping the slices, season with salt and pepper.
  3. Pour half of the béchamel over the potatoes.
  4. Add the remaining potatoes, season with salt and pepper.
  5. Add the remaining butter in small pieces all over, and the remaining béchamel. 
  6. Cover with foil and bake 50 minutes or until the potatoes are soft. 
  7. Remove the foil. Beat the eggs with 2 tablespoons milk and remaining cheese (4th cup.) 
  8. Pour the egg mixture evenly on top of the potatoes. 
  9. Put back in the oven for another 30 minutes or until the top is crispy and golden brown.

Sunday, May 26, 2013

Butternut Squash Gratin


This dish is perfect for a weekday light dinner. Quick and easy, it doesn't require any specific ingredient. As usual, my philosophy is to « use what you have in your pantry ». But first make sure to stock-up essential ingredients: spices, herbs, legumes and other non-perishable items to have them handy when needed. Other items that I stock-up for medium term include cheese. My favorite is Jarlsberg cheese. I find it's an all purpose cheese. This is what I used in this recipe.

"Herbes de Provence" is a mix of dried oregano, basil, thyme, rosemary, lavender, marjoram, sage and fennel seeds. You can make your own mix or simply use the herbs you have.
Believe it or not, the squash that I used here is from my garden from last year's harvest. This is a vegetable that can be stored for a long time!
OK, let's get to the cooking itself. I have said it in the past, I cook almost everything in a pressure cooker because it’s a big time saver. So for me it was easier to cut the squash in 2 lengthwise and throw it in the pressure cooker. It took 20 minutes total (5 minutes to bring to pressure and 15 minutes to cook). If you use a regular pot, I suggest that you peel and seed the squash. It will cook faster.

While it was cooking I made quinoa with turmeric to serve with my squash. 

Ingredients

For the butternut squash
1 medium butternut squash (2 pounds)
1 cup tomato sauce
Herbes de Provence
1 cup grated cheese
1/3 cup bread crumbs

For the quinoa
1 cup quinoa
1 tablespoon olive oil
1/2 cup finely chopped onion
4 garlic cloves, crushed
1/2 teaspoon turmeric
Salt to taste
2 cups water
Fresh herbs to decorate (parsley, mint, or basil)

Directions
Prepare the squash
  1. Cut off the top of the butternut squash near the stem, then cut the butternut squash in half lengthwise. Remove the seeds
  2. Steam in a Presto cut sides up for 15 minutes, or until tender
  3. Remove delicately from the presto and place cut sides up in a baking dish
  4. Season with salt and pepper
  5. Spread the tomato sauce over the squash
  6. Combine the bread crumbs, herbes de provence and cheese and sprinkle on the top.
  7. Bake for about 20 minutes at 400 degF or until the cheese begins to brown.
Prepare the quinoa
  1. Rinse quinoa; drain
  2. Heat the oil in a saucepan over medium heat. Add onion. Cook until it starts to brown, about 10 minutes. Stir from time to time. 
  3. Add garlic, turmeric and salt , and sauté 2 minutes. 
  4. Add quinoa; mix well for 2-3 minutes. 
  5. Add 2 cups water. Bring to boil; reduce heat to low. Cover; let it simmer until the quinoa is tender, about 20 minutes. All the liquid should be absorbed.

Wednesday, May 15, 2013

Garlic-Parsley Escargot Bouchees


Very tasty and garlicky amuse-bouche. Escargot is the french word for snail. This is a wonderful recipe that is quick and easy.
It's basically cooked escargots stuffed in mini buns with a lot of garlic-parsley butter!

Use the canned escargots from your supermarket. I do not recommend that you snatch live snails from your garden. It is such a hassle to prepare! In this recipe I am using homemade buns. Usually I make a bunch and freeze half of it. But you can use ready made puff pastry bouchees or simply mini hot dog rolls. The quantity below serves four (4).

Ingredients

1 can escargots (snails)
1 stick unsalted butter, softened
½ cup finely chopped parsley
2 tablespoons crushed garlic
1 tablespoon lemon juice
Salt and pepper to taste
1 tablespoon Herbes de Provence (or a mix of thyme, oregano, bay leaf.)
2 dozens very small buns


Directions
  1. Open the can.
  2. Drain and rinse the snails thoroughly. I always discard the liquid from the can.
  3. Prepare a court-bouillon: 1 cup water, the herbs, salt and pepper. Bring to a boil.
  4. Add the snails and let simmer for 3-5 minutes on medium to low heat. Drain.
  5. In the meantime, mix the butter, garlic, parsley, lemon juice, salt and pepper.
  6. Cut the buns up to the center. Spread a generous amount of butter in each bun and stuff with 2 escargots. Close the bun and place in a baking dish.
  7. Up to this step your bouchees can be prepared ahead of time (few hours before)
  8. Just before serving, heat the bouchees in medium hot oven 10-15 minutes.
Enjoy!


Sunday, April 21, 2013

Anise Seeds and Orange Blossom Water Buns


These buns are very popular in North Africa. They are sold in the streets and served for breakfast with jam.Usually these buns are sprinkled with sesame seeds. I had none left, so I used sugar instead.

Ingredients
4 cups of flour
1.5 tablespoon instant dry yeast
2/3 cup granulated sugar
1cup warm milk
1/4 cup light olive oil
2 eggs
2 tablespoons orange blossom water
2 tablespoons ground anise seeds
1 tablespoon ground fennel seeds

Decoration
1 egg yolk, 1 teaspoon milk
Granulated sugar (or brown sugar)

Directions

I used a stand mixer with a dough hook to prepare the dough.

  1. Put the flour in the mixer with the yeast and the seeds. Mix for few seconds
  2. In a separate bowl, beat the 2 eggs, mix in the sugar, oil and milk. Add the orange flower water to this mix.
  3. Pour the liquid mixture into the flour, with the mixer running. Mix until you get a very smooth dough. The sides of the bowl should be clean. It will take around 8 minutes.
  4. Remove the dough from the food processor.
  5. If you have time, put it into a slightly oiled bowl, cover and let it rise in a warm place for 30-45 minutes. Knock down the dough. If you are in a hurry, jump to the next step.
  6. Divide the dough into 16-20 equal pieces. (I divided mine into 16, but I find they are too big)
  7. Roll each piece into a ball. If you find it sticky, oil your hands slightly( I shaped a few like donoughts)
  8. Place each bun on a lightly oiled baking sheet. Cover with a clean towel and let it rise until the buns have nearly doubled in size.
  9. Mix the egg yolk with 1 teaspoon of milk to make an egg wash. Brush the buns with this mixture and sprinkle with sugar.
  10. Heat the oven to 400 deg F.
  11. Bake the buns for 15 minutes, or until they have a nice golden color on the top.


Friday, March 29, 2013

Mushroom Hard Boiled Egg


I have vivid memories about Easter time in my family. My mother used to make hard boiled eggs and decorate them as mushrooms for lunch. I was always so impressed because they looked like real mushrooms. She would make them while we were playing outside, so when we would come back for lunch, a beautiful plate with « mushrooms» decorating the center of the table was awaiting for us.

Ingredients
For 6:
6 hard boiled eggs
6 Italian tomatoes
Mayonnaise

Directions

  1. Peel the eggs and cut a slice at the large end to enable them to stand up. This is what your egg will sit on so it doesn't roll away.
  2. Cut tomatoes around 3/4 from bottom stem. Use the last 1/4 to make hats for the eggs. You may need to core those hats slightly to make them fit.
  3. Use mayonnaise to make dots on the tomatoes to simulate mushrooms.

Tips 
Use toothpicks if necessary to stick the tomatoes to the eggs. Be careful to advise your guest.

Monday, March 18, 2013

Apple Chocolate Cake


Every now and then I tried to "clean-up" my fridge and pantry. It's like Ali Baba's cave. I always find something buried that I completely forgot about and should be used or else thrown away soon. So yesterday I ended up doing something completely different from what I had planned. I found 5 Red Delicious apples that weren't that delicious and this is why they were still in the fridge after 3 weeks. I also had 5 squares Baker’s style dark chocolate, left over from the 2 pounds bought at Christmas time. I knew I had to use them up! As you can see, the chocolate and layer of apples ended up in the bottom tier of the cake rather than in the middle. Nevertheless, the result was this simple and unpretentious cake to enjoy any time.

Ingredients
For the apples:
5 apples
3 tablespoons brown sugar

For the cake:
4 eggs
2/3 cup granulated sugar
3/4 cup all purpose flour
1/3 cup corn starch
1 tablespoon baking powder
3 tablespoons vegetable oil
3 tablespoons rum
4+1 tablespoons orange juice
5 squares Baker’s style dark chocolate

9 inch round pan

Directions

Cooking the apples
Peel, core and cut the apples around 1 inch long x 1/3 inch thick. Place in a saucepan with the brown sugar. Mix gently and cook over medium heat, stirring from time to time, until the apples start to soften.

Making the cake
  1. Heat your oven at 375 degrees F
  2. Butter your mold and dust evenly with flour
  3. Separate the egg whites and yolks
  4. In a large bowl beat the egg yolks and sugar with an electric mixer. You should obtain a pale yellow color
  5. Gradually add the oil, then the rum and juice, while still beating
  6. Whisk the flour, corn starch and baking powder together and add to the sugar and egg mixture, mixing until well blended
  7. Fold in half of the cooked apples into the batter
  8. Beat the egg whites until firm and fold in delicately
  9. Melt the chocolate with one tablespoon of orange juice in the microwave
  10. Pour half of the batter in the mold
  11. Spread the remaining apples evenly, then the melted chocolate
  12. Cover with remaining batter
  13. Bake at 375 degrees F (200 degrees C) for 30-35 minutes
  14. Let the cake cool in pan for about 10 minutes. Run a thin spatula or knife around the edge of the cake to loosen the sides from pan and shake to unmold. Invert the cake over on a plate and let it cool completely.
  15. Decorate with icing sugar.


Monday, March 4, 2013

Quick and Light Brioches with Chocolate

Brioche is definitely my favorite breakfast. At least once a month I would make one type or another. These ones are quick, easy to make. This time I had leftover truffles from Christmas in the fridge, so I thought why not use them? At the second rise I had to go out for a small errand. When I came back the brioches were overflowing from the pan! The result was very tasty.


Ingredients
1.5 tablespoon instant dry yeast (or regular dry yeast)
3- 3/4 cups all-purpose flour
Pinch of salt
3/4 cup milk
¾ cup sugar
1/4 cup butter, softened, plus more for the bowl and molds
2 large eggs, lightly beaten
Orange zest
Your favorite chocolate: Nutella, Baker style chocolate or chocolate chips
I used left over truffles from Christmas.

Directions
  1. If you are using regular dry yeast: dissolve the yeast in 4 tablespoons warm milk in a small bowl and let it sit for several minutes to start to bubble.
  2. Put the remaining milk, sugar and butter in a bowl and heat in microwave just enough to dissolve the butter.
  3. Add the eggs and mix well.
  4. Put the flour and salt in the bowl of the food processor, and run the machine for a few seconds to blend.
  5. With the food processor running, add the instant dry yeast or the dissolved regular yeast.
  6. Add all the liquid and process for 30 seconds or so. The dough should be very soft.
  7.  Cover and let it rise until it doubles (around 1 hour).
  8.  Butter the muffin pan.
  9. Deflate the dough, and cut it into 24 equal pieces.
  10. Roll each piece into a round, and place it in the mold. Add a piece of chocolate in the center. Cover with another piece of dough to fill the mold up to two-third. Try to seal the 2 pieces together.
  11. Let the brioches rise again 30 minutes or more.
  12. Heat the oven to 375 degrees.
  13. Mix the egg yolk with 1 tablespoon of milk to make an egg wash. Lightly brush the brioches with this mixture and sprinkle with sugar.
  14. Bake the brioche for 20 minutes, or until they have a nice golden color on the top.


Monday, February 18, 2013

Cheese Soufflé


Cheese soufflé has a reputation of being a difficult dish to make successfully, so most of the people are too intimidated to try it. I can assure you it is not! Basically it's a Béchamel sauce to which you add egg yolks, cheese, spices and stiff egg whites. Et voilà, your soufflé is ready to bake.
If you follow some basic rules you will never fail it!
1) The egg whites are what make the soufflé to rise, so it's critical the whites are very stiff.
2) Wait until the egg mixture is cooled a little bit before adding the whites. Add them in 2 steps as explained in the recipe
3) It is absolutely forbidden to open the oven door while the soufflé is cooking.
4) Prepare the table and be ready to serve the soufflé immediately right from the oven if you want to impress everyone around the table. The French word "
soufflé" means "blown". Its elegance lasts only for one moment, after that it collapses. Make sure it is still "blown" when you serve it and your dinner table will be blown away!
My photographer was ready to capture that moment, and to eat the soufflé of course...

The history of soufflé: It is said that king Louis XIV had such a bad dentition that he had to feed on soups most of the time. A cook had the brilliant idea of adding eggs to the Béchamel sauce to turn it into a more attractive soup for the king, creamy and elegant.

The step by step pictures below are not great, my photographer was not available during the preparation. Since I wanted to show you what the soufflé looks like at each step of the process, 
I took the pictures. You can tell I am not an expert.

Ingredients
¼ cup butter
½ cup flour
1 2/3 cup milk, hot
4 cups grated Gruyere or Emmenthal
4 eggs, separated
Generous pinch of ground nutmeg
Salt and pepper to taste

Souffle dish (8in diameter, 3in deep) or 6 ramequins

Directions 
  1. Use 1 tablespoon butter to brush the inside of the soufflé dish(es). 
  2. Melt remaining butter in a large saucepan. Whisk the flour and cook few minutes on low to medium heat.
  3. Remove from heat and gradually add the milk, continuously whisking until the mixture is smooth.


  4. Return to heat and cook 3-4 minutes more, still stirring. Add seasoning.
  5. Remove from heat, stir in the cheese and mix well.


  6. Add the egg yolks.

  7. Pre-heat the oven to 400F.
  8. Whip the egg whites until they form peaks and look firm.
  9. Add 1/4 of the egg whites to the cheese mixture and mix in.


  10. Continue to add the whites gradually, folding gently, and lifting the batter.
  11. Spoon the batter into the prepared dish(es). The mixture should fill up to 3/4 of the molds


  12. Bake 25-30 minutes or until the top is golden brown. 
Cheese Soufflé (Soufflé au Fromage)

I like to serve it with a leafy greens salad as an elegant start to a special meal.